Once you have your flight suit, flak vest, and armor plates, it’s time to decide how you’re going to attach your Mandalorian armor to your clothing parts. There are a few attachment methods that are popular and work well. You might want to experiment with a few methods to find which method you’re most comfortable using. You might also want to use 2 different attachment methods for an area, this way if one method fails you have a backup.
You can work on your attachment method either before or after painting your armor. I suggest doing the attachment work before painting since you might want to trim or reshape your plates one last time. It also helps you to avoid damaging a new paint job. When you’re ready to attach the plates, it’s recommended that you start with the collar plate and work your way down. And it’s also a good idea to mark the plate pieces with “left” or “right”.
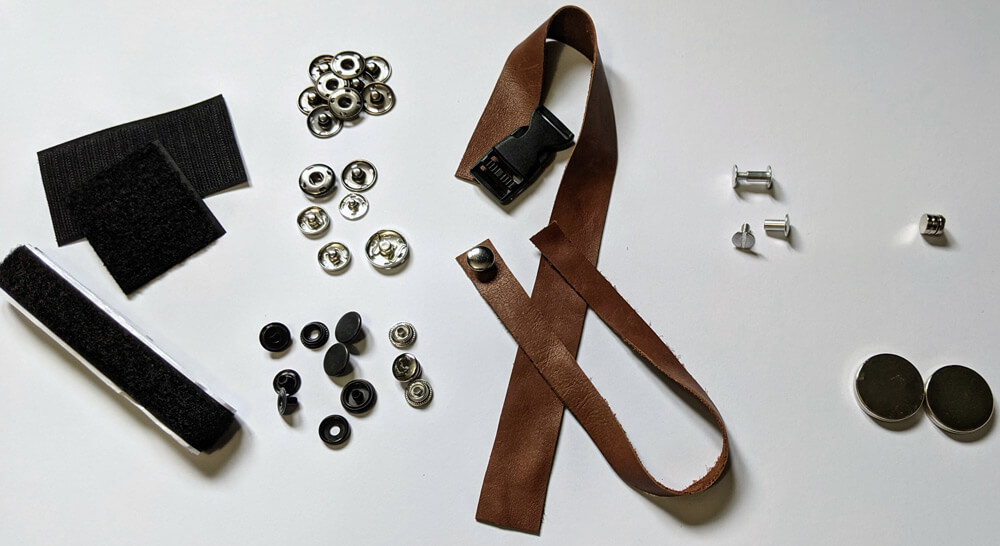
Common methods to attach Mandalorian Armor
Velcro
This is probably the easiest option and most beginner-friendly. Use sew-on velcro for fabrics, and adhesive/sticky velcro for the armor plates. Don’t try to sew sticky velcro with a sewing machine, it will gunk up and ruin the needle. Also, don’t try to use sticky velcro on fabric, it just won’t hold. Use the soft side of the velcro on the fabrics, and the loop side on the armor. This way you can wash your flight suit and vest without worrying about the velcro catching other clothing in the washer or dryer. To help you position the velcro, wear your flight suit or vest, then trace the outline of the plate with chalk. Either hold it with one hand, use duct tape, or get a helper. This will give you a guide on where to sew the velcro.

Snaps/Rivets
Heavy-duty snaps are popular since they prevent any shifting and make the spacing placement permanent. But you need to make sure you get that spacing placement perfect. The male end of the snaps are glued to the armor, and the other end is punched into the fabric. You may want to scratch/score/sand the spot on the armor plate so that the glue has better adhesion.
E6000 is a popular glue that’s easy to find, but it does require hours to set. A full cure takes between 24-72 hours depending on your local temperature and humidity. I suggest clamping the snap down and leaving it at least overnight before handling it. Some people prefer 2-part epoxy glues, PVC cement, or a quick super glue like Loctite. Just remember if you’re using super glue, you need perfect placement since it sets in seconds. And if you’re using 3D print material like PLA, PETG, or ABS plastic some glues work better than others. Use whatever glue you’re most comfortable with and can find in your country. Not sure what glue to use? This to That might help.
Once the glue has dried, use the plate snaps to make your marks on the fabric. Place a bit of paint, chalk, or even a dab of toothpaste on the snap tip. Then while wearing your flight suit or vest, press the armor onto your fabric to transfer the mark.


Another option with less commitment than regular snaps are sew-on snaps. These are my personal favorite since you can re-position them if you didn’t get the spacing perfect the first time. Female chest plate spacing can be tricky, so being able to move the sew-on snaps lets you make adjustments. If you do decide to do sew-on snaps, when you’re finished sewing them to the fabric, apply some fray check to the threads or even a dab of glue to strengthen them, or use a stronger thread, like upholstery thread.

Straps
Straps are popular for shin, knee, and thigh armor. You can choose either leather or webbing straps that will be visible and secure with buckles or snaps. You can also use a hidden elastic strap as used in the screen Jango costume. The hidden strap feeds into a buttonhole to the inside of the flight suit.


Magnets
Strong neodymium magnets are another attachment option. These magnets are strong and work well, but some people find them tricky to set up. Try to space them far enough away from each other so that you don’t have trouble setting them. One magnet is glued to the armor, and the other magnet is secured to the fabric. Below you can see the magnet placement for a backplate to the flak vest. When you glue the magnets to the armor, place the polarity facing the same direction. This will make it easier when placing the other magnets on the vest. On the fabric, you can make tiny pockets of fabric or velcro to hold the magnet, this way they can be removed when you want to wash the fabric. If you’re using 6mm thick Sintra, you may want to sink the magnet into the plate so that it lies flush flat. (Note that extremely strong magnets may cause issues with cell phones and should be kept away from children.)


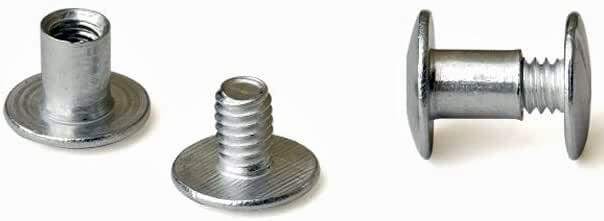
Bolts/Chicago Screws/Grommets
Like regular snaps, bolts or screws require that you get the spacing accurate the first time since you’re making a hole in the flight suit or vest. Triple check the placement. It’s a sturdy option and great if you’re comfortable using bolts, Chicago screws, and grommets.
Keep Reading: >>
How should I attach a 40+ pound armor front and back plate to it?
(It’s made of 8 gauge steel)
For heavier armor I would go with heavy duty Chicago screws.
What do y’all think would be the best way to attach a heavy fiberglass armor piece to canvas? I’m thinking heavy snaps with Velcro as a backup in case the snaps fail.
Most people have their preferred method. Choose whatever you’re most comfortable working with. For heavy pieces, heavy-duty snaps or bolts/chicago screws are good choices.
Does the MMCC require that pieces of armor be spaced with a 1/2” gap between each piece
This is what the MMCC website states, ” Chest armor: Must be fitted and spaced correctly and consistently depending on armor/body type. Generally, maximum spacing should equal no more than 1” or 2.5 cm between the collar/chest/abdomen plates and no more than ½” or 12 mm between the diamond and chest plates.”
http://mandalorianmercs.org/get-involved/costume-requirements/