Armor Paper Templates
Now that you have your PVC board/Sintra, you can start to actually make armor!
The first step is to print off the armor templates or create your own. Templates are available for Jango or Boba Fett style armor in various sizes for people 5-3 to over 6 ft tall. Armor templates are also available for children 3-4 ft tall. Boba and Jango’s armor are similar in shape, but Jango has leg armor that Boba doesn’t wear. This is also the difference between light and medium class Mandalorian armor.
Go here for Jango printable armor templates in various sizes. And more template files here and here.
You can also create your own custom armor templates if you want a different shape or style. Use paper to prototype the armor shape you want, and test the sizing on your body. If you want to make a post-empire Mandalorian like Din Djarin or Bo Katan, most people use 3D prints. You can still use Sintra but it might be a bit more challenging to construct. You might need to create your own templates to get this style since I haven’t found any free post-empire templates online yet. But if you do a search for EVA-foam templates, you might find some being offered for sale. I suggest you then use the template on Sintra material instead of Eva-foam.
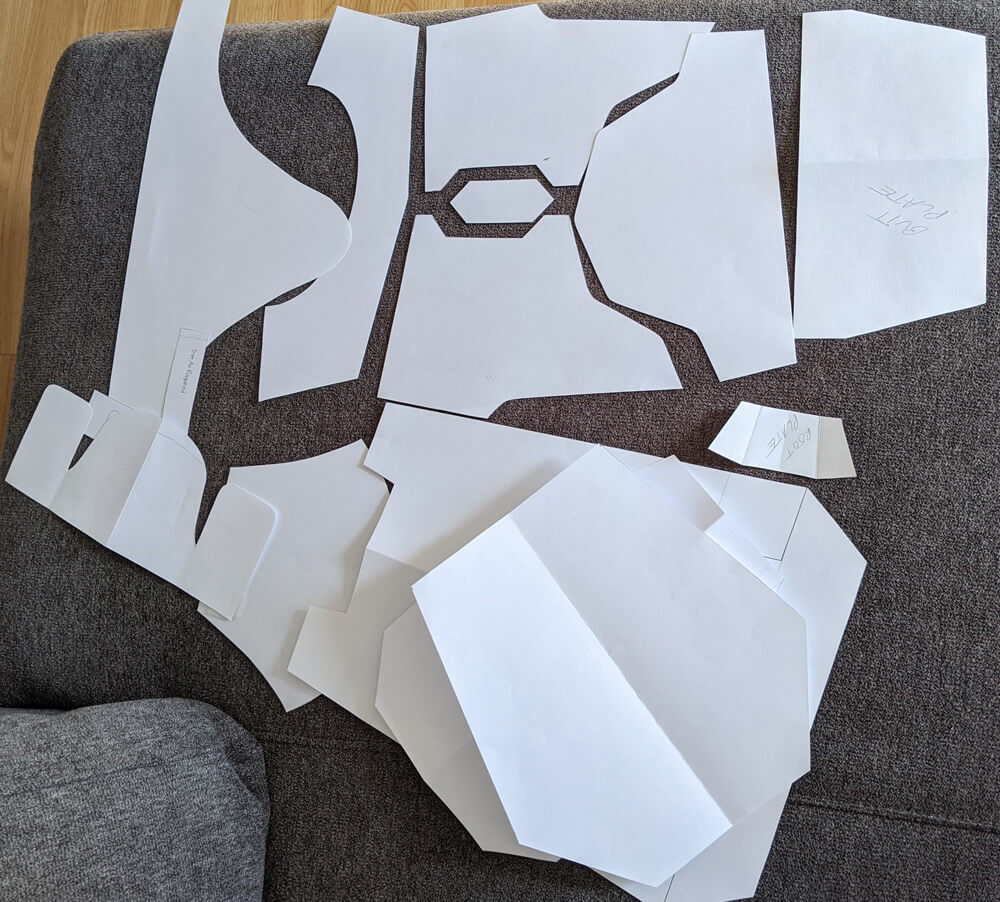
Once you have your paper templates cut out, you need to check the sizing and spacing of the pieces on your body. This can be a frustrating process, especially for females. But if you take your time, it’s worth it in the end. (Note that females can use the male chest templates with a bit of modifying. Female bust sizes D cup and over will probably need special chest plates with darts or 3D prints.)
The knee templates and the back armor a bit more challenging for beginners. I suggest you modify these templates to make them easier to construct. You can avoid the blaster darts on the knee to simplify the pattern. You can also skip the seam dart and just shape it with a subtle curve. Or create your own custom knee design. (See the video below on the traditional knee construction.)

I suggest you wear your Mandalorian flight suit and flak vest, and either tape or pin the paper pieces over top. This is why I suggest finishing your soft parts first before working on your armor. To get the best fit and alignment, you want to fit the vest to your body, and fit the armor to your vest, While wearing the paper templates, have a pencil handy so that you can ruff in any areas that might need to be trimmed more. Start with the collar plate and work your way down. Work on the top half of your body, then move on to the lower half to check the leg armor spacing. You can check your back armor by placing it on your flak vest or by having someone else check it for you. If you’re unsure of the fit of your pieces, it’s a good idea to photograph yourself wearing the paper templates, and get another person’s opinion. Keep in mind that you’ll be heat-shaping your armor next for a custom fit. The nice thing about Sintra is that you can reshape/trim it as needed, so don’t worry if you don’t get it perfect the first time.
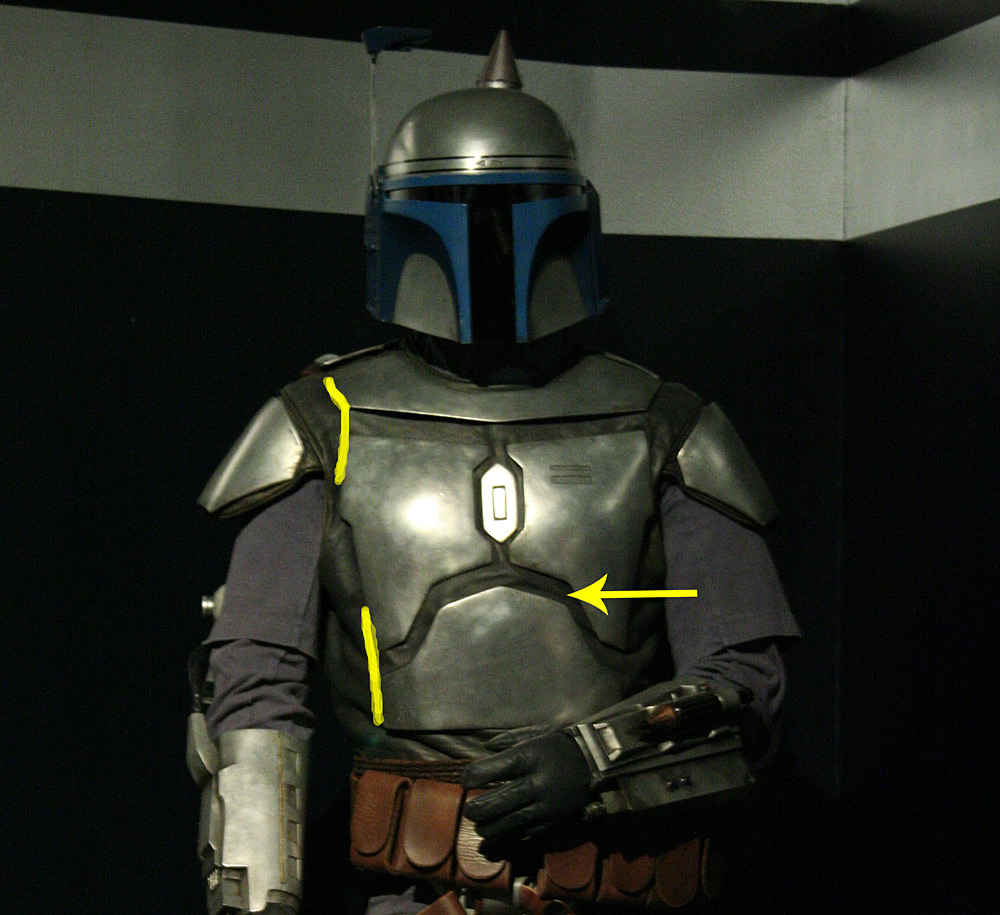
Mandalorian armor plate sizing and spacing tips.
- leave about a thumb space or 1inch between the chest plates, and ½ inch around the center diamond
- The collar plate is placed up high near the throat
- Chest edges should line up with collar edges and belly plate edges
- Plates should look proportional to your body
- Try the cross-arm test. Reach over to see if the plates dig into the armpit area too much
- Chest plates and back armor shouldn’t extend past your flak vest bottom
- The top of the shoulder plates should line up with shoulder seam or slightly above it
- The back armor plate should cover at least ⅔ of your back


Cutting Armor Plates
Now that you have your armor paper templates sized to your body, choose your armor material thickness. 3mm or 6mm Sintra is the most common. 3mm is recommended for beginners since it’s easy to cut and shape, and cheaper to buy. But you can choose 6mm for a “beefier” look or for extra durability, especially on areas like the knees. Just be aware 6mm is harder to cut by hand, a Dremel cutting tool might be a better option than box cutters. Or my personal favorite, layering two 3mm pieces to create “trauma plates” or custom armor designs.
When gluing 2 pieces of Sintra together, sand or score the plastic for better adhesion, and clamp together overnight. E6000 glue is easy to find for most people and lets you play around with placement before it sets. Some people prefer 2-part epoxy glues, PVC cement, or a quick super glue like Loctite. Just remember if you’re using super glue, you need perfect placement since it sets in seconds. And if you’re using 3D print material like PLA, PETG, or ABS plastic some glues work better than others. Use whatever glue you’re most comfortable with and can find in your country. Not sure what glue to use with other materials? This to That might help.

Trace your pieces onto the PVC foam board. Below you can see all my pieces traced out (except gauntlets and helmet). For a medium armor class Mandalorian (like Jango), you need slightly more than a 2 ft x 4 ft sheet. In my area (Ontario, Canada), a 4 x 8 ft sheet of 3mm Palight PVC foam board cost me $34. Using Sintra instead of 3D prints allows people to make a Mandalorian costume pretty cheap. If you can buy extra for practicing and in case of mistakes.

Lay your sheet on top of a kitchen cutting board or old plywood board. You don’t want to damage your floor, carpet, or good table when cutting. Keep knife safety always in mind. Respect the blade! Go slow and ideally use gloves to prevent injury. Remember slow is smooth, and smooth is fast. Using a box cutter or Exacto knife, go over your tracing line about 3-5 times. Take your time, score first, then make multiple passes. A metal ruler may help you cut along straight lines.
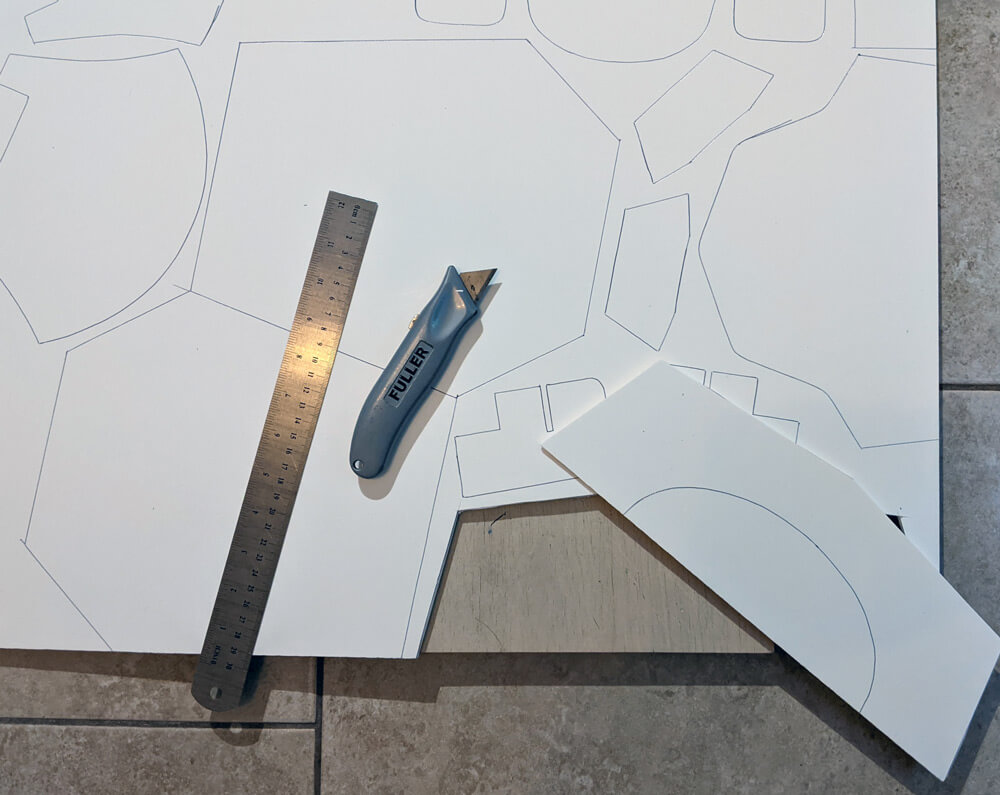
Once you have all your PVC board pieces cut, it’s time to sand the edges. Go over the plates with fine sandpaper, like 220 grit, to smooth the edges and remove any sharp points. If you have any areas with dents or ruff knife marks, consider these happy accidents and call it natural weathering or battle damage.
Keep reading: >>
It’s crazy that we’re still using templates that are nearly 20 years old, and that they’re still the best out there.
do you know were i can find templates for the v1 mando suit or the death watch suit from the mandalorian?